What if you and the agent shared a real-time progress board instead of a buried chat thread?
Chapter 05 introduced MCP servers and plugins. Now you’ll use a canvas extension, which can be installed through a plugin or created for your own workflow.
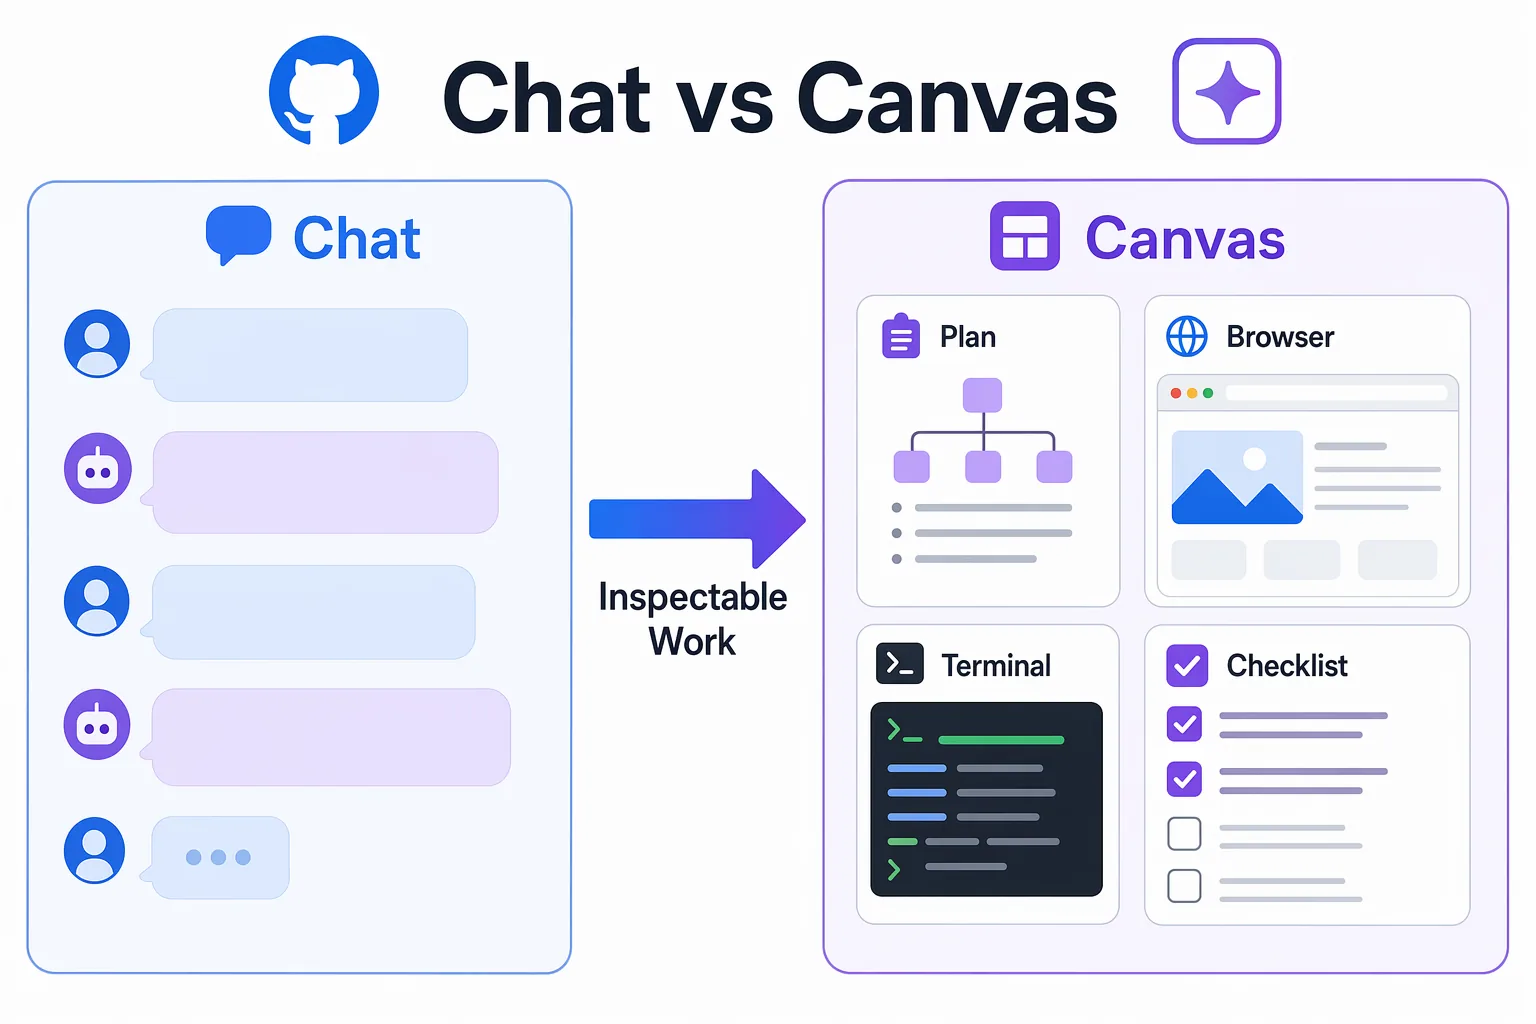
Chat works well for questions and discussion. But once a session is doing real work, a long chat thread gets hard to scan. A canvas is a shared board in the side panel that you and the agent can both see and update. You create one with /create-canvas and a description of the board you want.
In this chapter, you’ll try a community canvas, then build a session board and a Feature Workbench that keep plan steps, validation checks, and notes visible.
Learning Objectives
By the end of this chapter, you’ll be able to:
- Explain when a canvas works better than a long chat thread
- Install and try a community canvas from a plugin
- Create your own canvases with
/create-canvas - Keep plan state and validation evidence visible on a canvas
⏱️ Estimated Time: ~70-90 minutes
Prerequisites
Complete Chapter 05 so you know how to install and review a plugin.
Prepare a session and confirm that the sample app is ready:
-
Use Create from > Branches >
mainto start a new worktree session for the course repository. Select Interactive mode. If an agent picker appears below the prompt box, select Default agent. -
In the review panel’s Terminal tab, run the following commands from the worktree’s repository root:
cd samples/book-app-web
npm install
npm test -- --run
npm run build
All three commands should finish without errors. Note the test totals. Your canvas will use them as its baseline.
From the Studio: The Band’s Arrangement Board
Imagine a band planning a song. They could argue their options in a long group chat, where decisions get buried, or they could use a shared arrangement board to keep everything visible and organized.
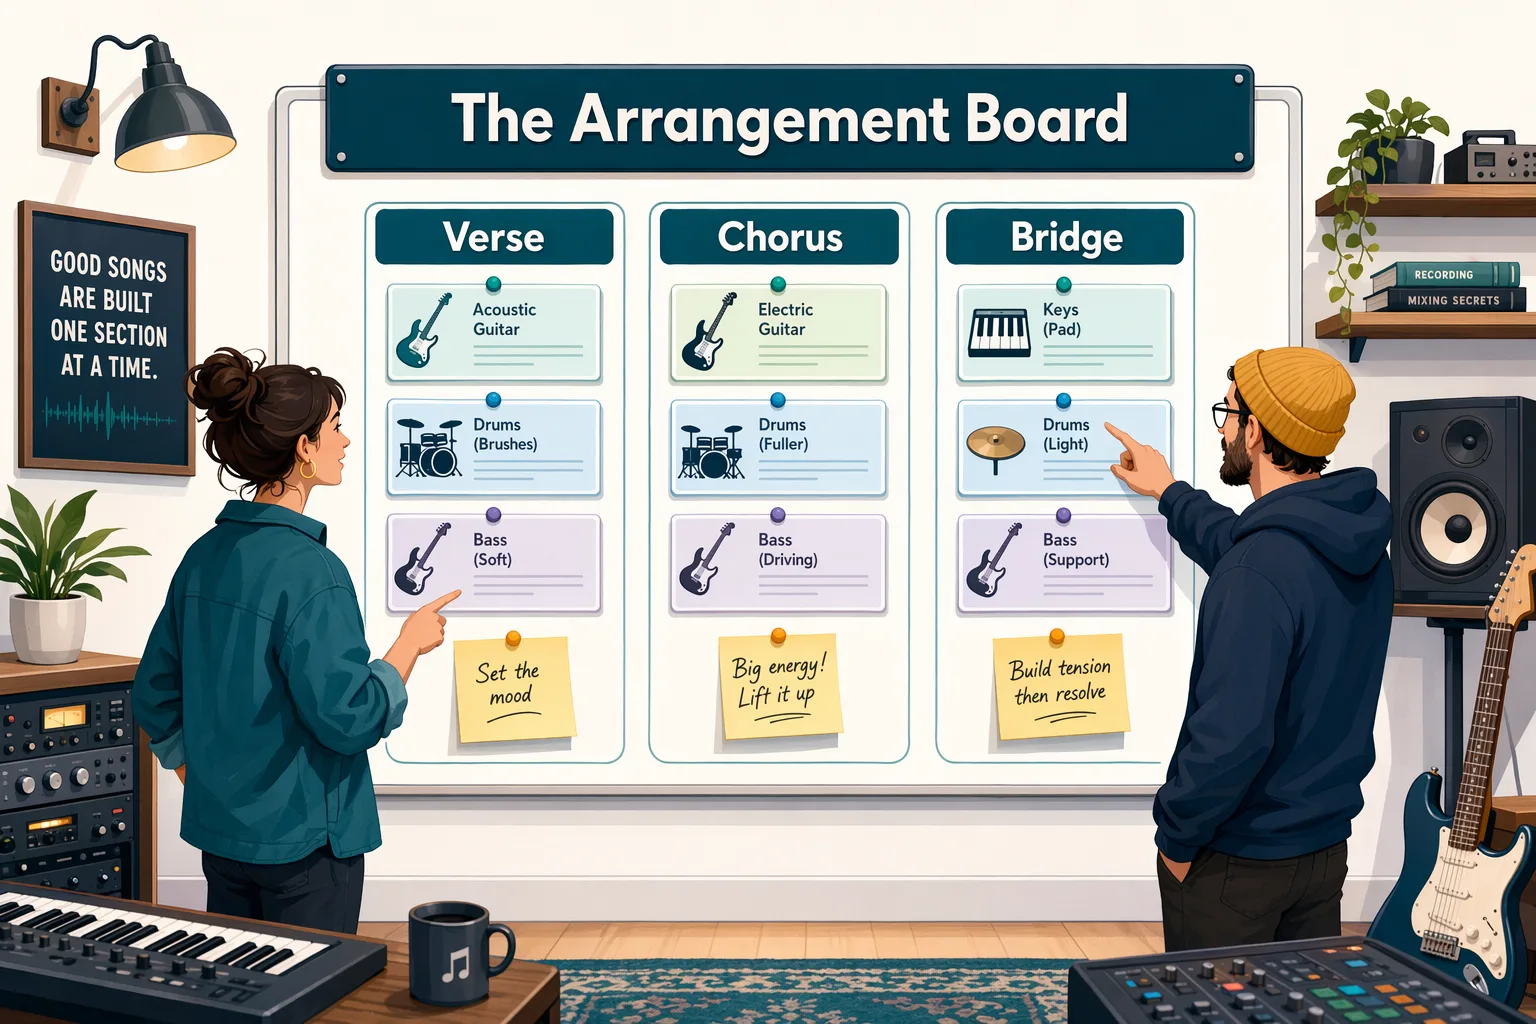
A canvas is the app’s arrangement board for human-agent work.
Core Concepts
A Canvas Is a Shared Control Panel
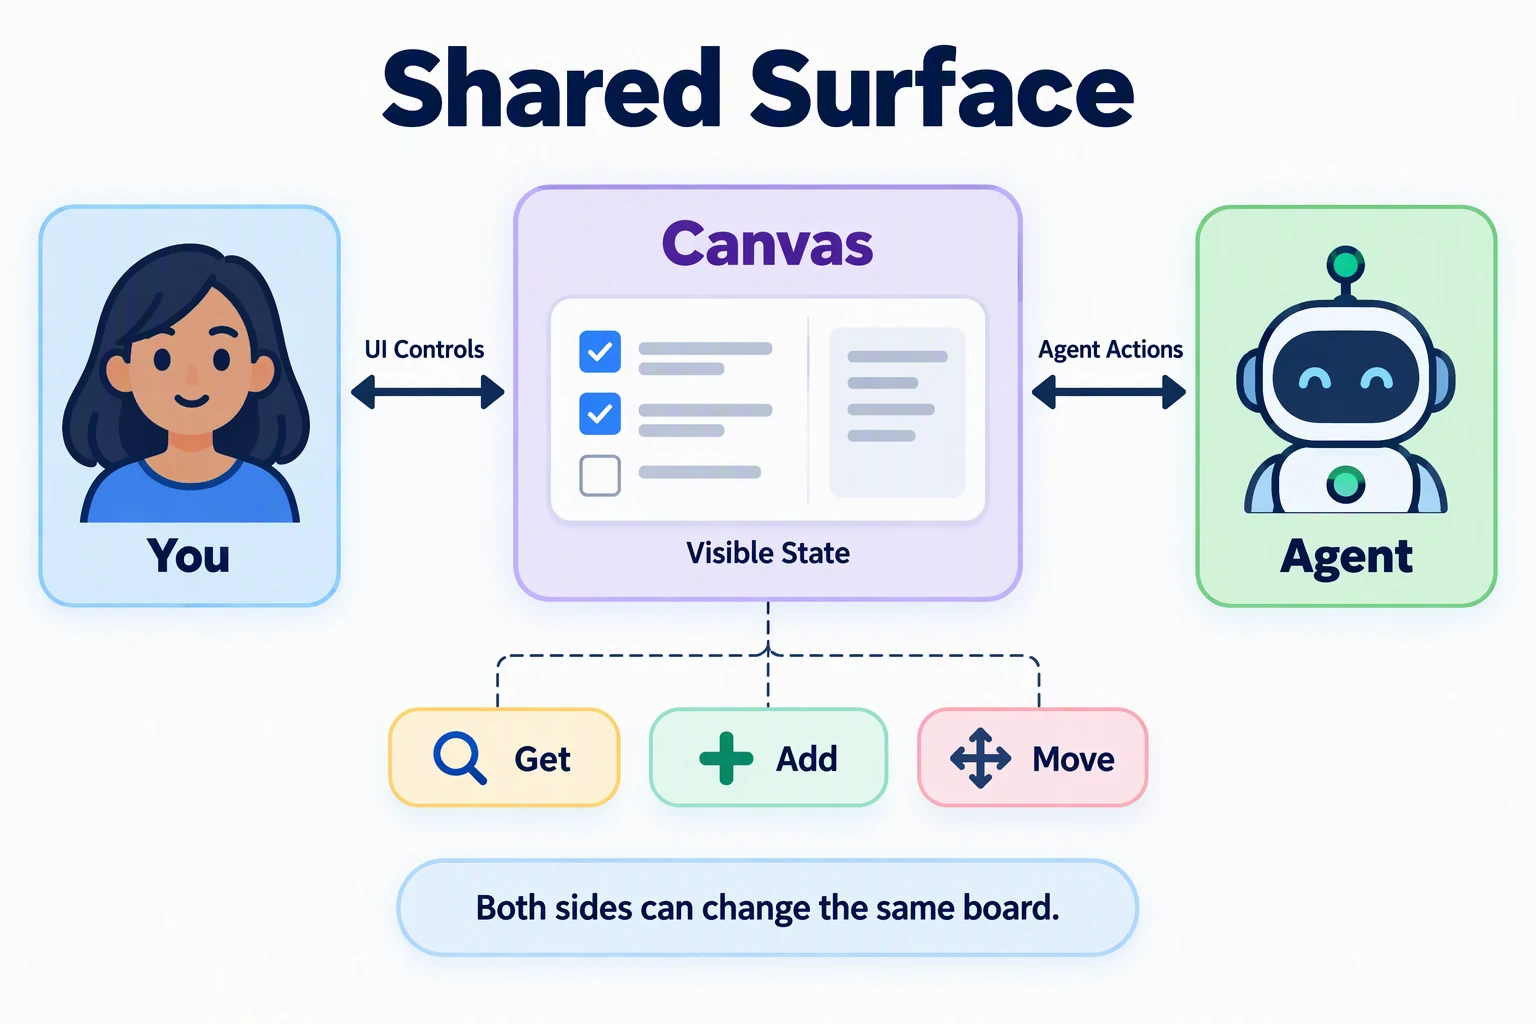
A canvas is bidirectional: you and the agent can both change the same board. For example:
- GitHub Copilot adds plan steps to the board.
- You uncheck a step or write “pause before edits” in the notes.
- GitHub Copilot continues from your update, not from a buried chat sentence.
Terms used in the exercises
| Term | Meaning |
|---|---|
| Agent-callable action | An action that the canvas gives the agent, such as updating a checklist item. In Exercise 3, each canvas button also asks the agent to do work, such as running tests |
| User scope | The canvas is available to you across projects and is not committed to this repository |
| Local-only UI | A control that changes only what you see and does not tell the agent about the change |
| Event | A recorded state change, such as a plan being approved |
| Polling | Checking at intervals for a state change |
| Timeout | The maximum time an action can run before it stops |
You do not need to write extension code in this chapter. These terms help you understand the detailed prompt in a later exercise and diagnose a generated canvas.
Built-In Work Surfaces Come First
The Plan, Terminal, Browser, and Changes panels that you used in earlier chapters come with every session. A canvas adds one more surface that you design for the task.
When to Use a Canvas
Use chat for a quick answer to a short task. Use a canvas when the work has state to keep visible, steps that repeat, or controls that you and the agent both use.
Exercise 1: Try Your First Canvas
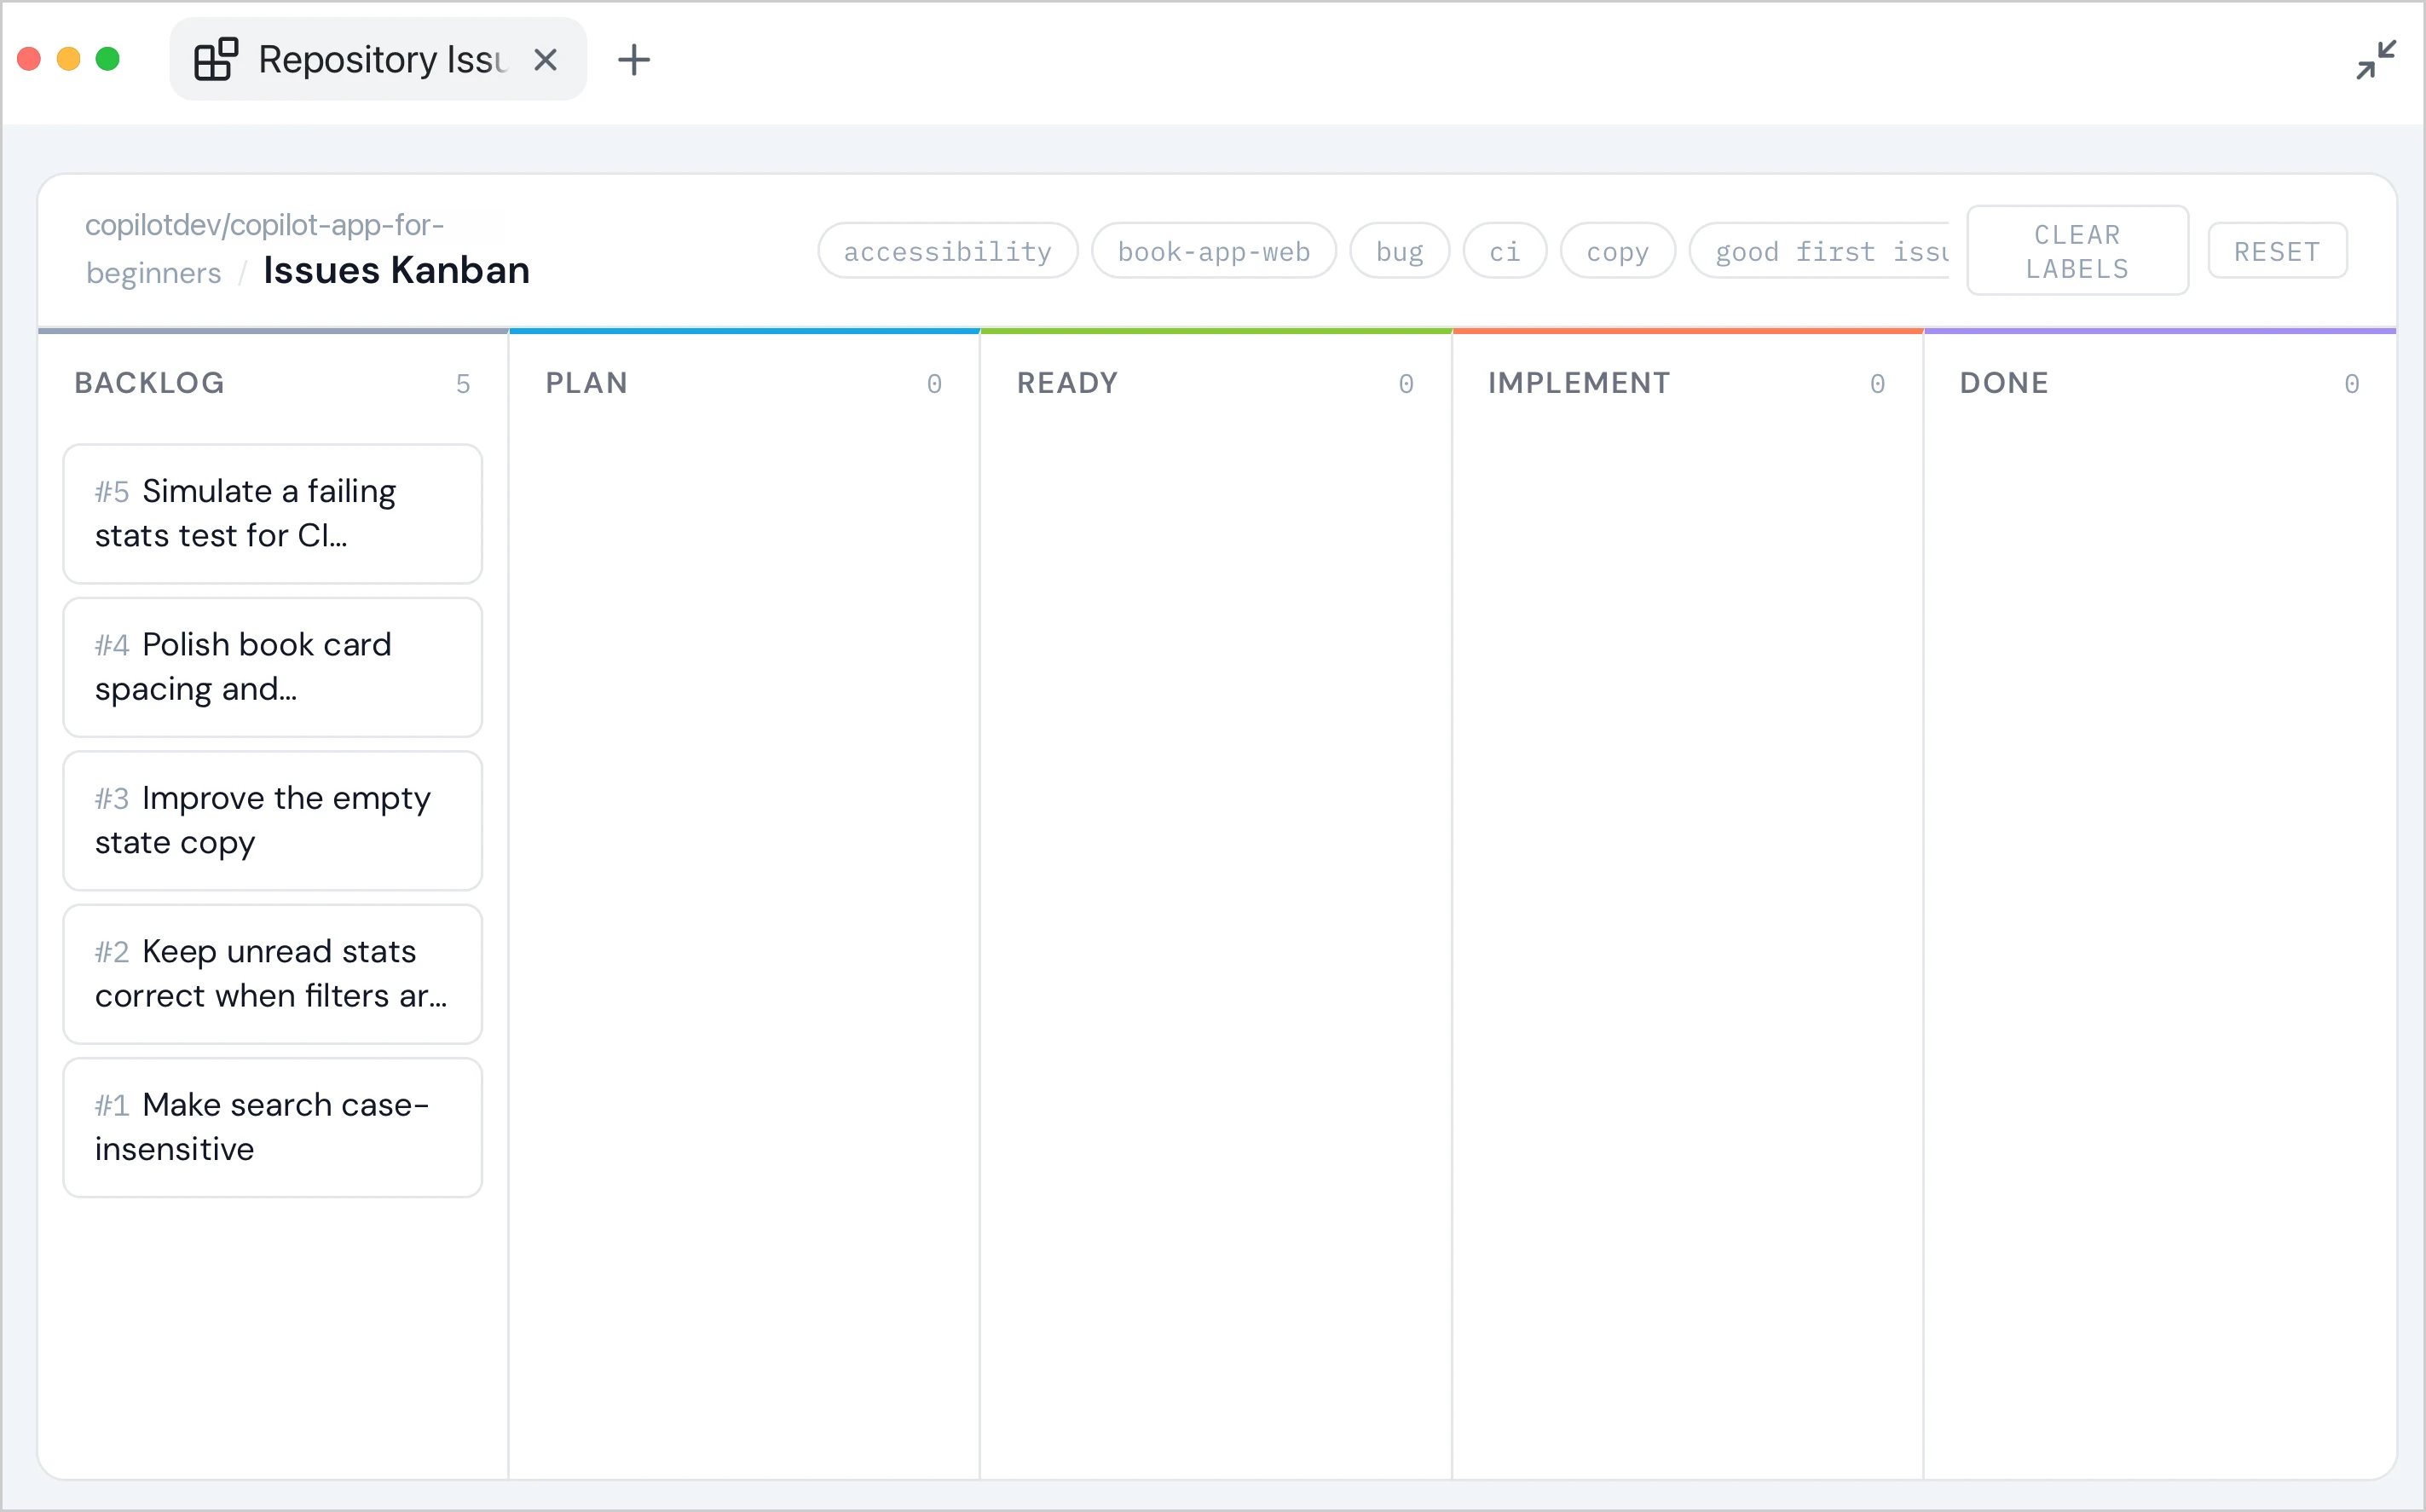
Before building your own canvas, try one from the community. Awesome GitHub Copilot is a curated collection of agents, instructions, skills, and canvas extensions you can install into the GitHub Copilot app. The Repository Issues Kanban is a good first canvas to explore. It pulls repository issues into a kanban board you can triage and track inside a session.
-
On the Repository Issues Kanban page of the Awesome Copilot website, select Open in Copilot app to install it in your GitHub Copilot app. If your browser asks to open the GitHub Copilot app, allow it.
- In the Install plugin? dialog, select Allow.
- In the Install plugin dialog, confirm that the name is
accessibility-kanban@awesome-copilot, then select Install. - Confirm that the plugin appears under Installed in Customize > Plugins, with its toggle on.
-
Return to the worktree session you prepared in the prerequisites and submit the prompt
Restart canvas extensions. This will reload the extensions and pick up the newly installed one. -
In the review panel, select + (Add tab), then Canvas, and select Repository Issues Kanban. If the review panel is hidden, select View > Toggle Review Panel first. The package is named
accessibility-kanban, but Repository Issues Kanban is the name shown in the app.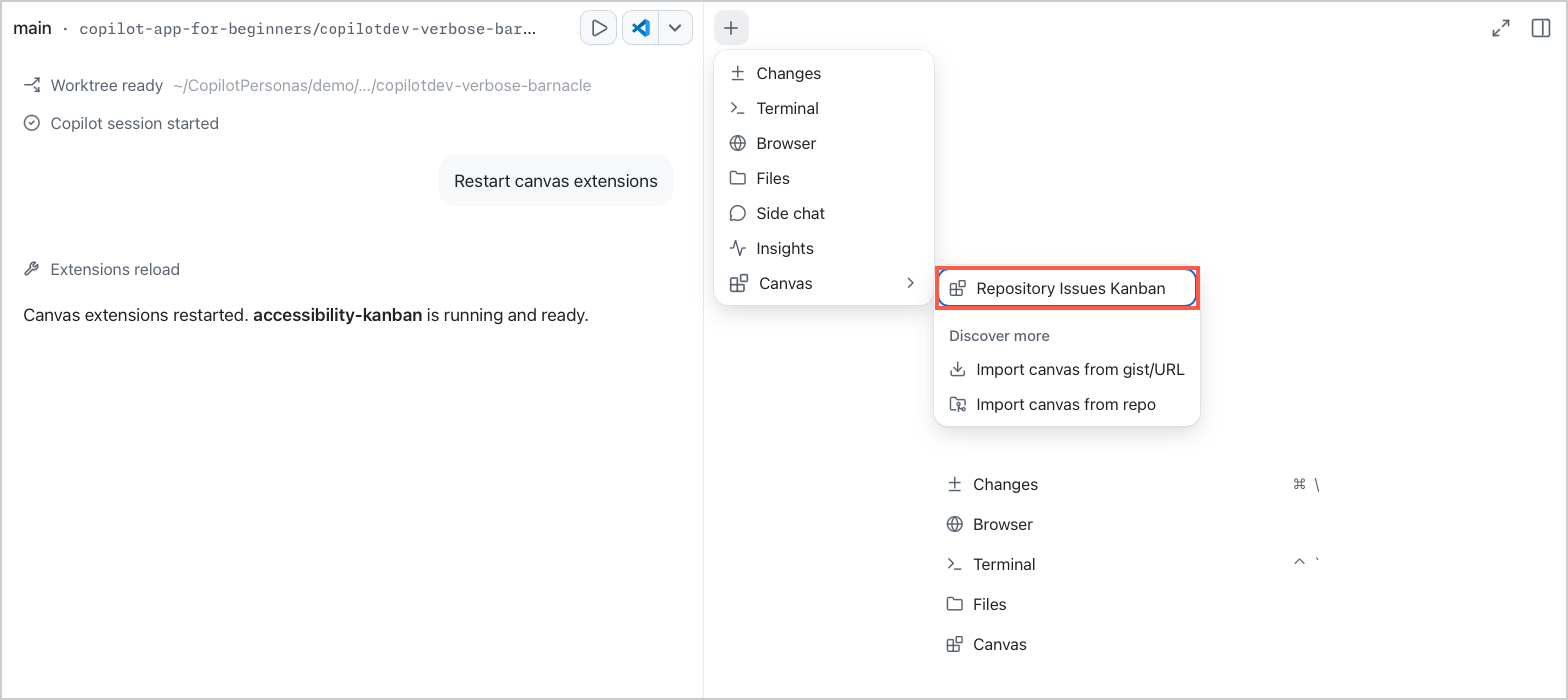
-
The board loads issues from the current repository and organizes them by status.
-
Drag an issue between columns and notice how the canvas keeps state visible without scrolling through chat.
Take a minute to move items around. This is the interaction model you will build on in Exercise 2.
Exercise 2: Create a Session Board
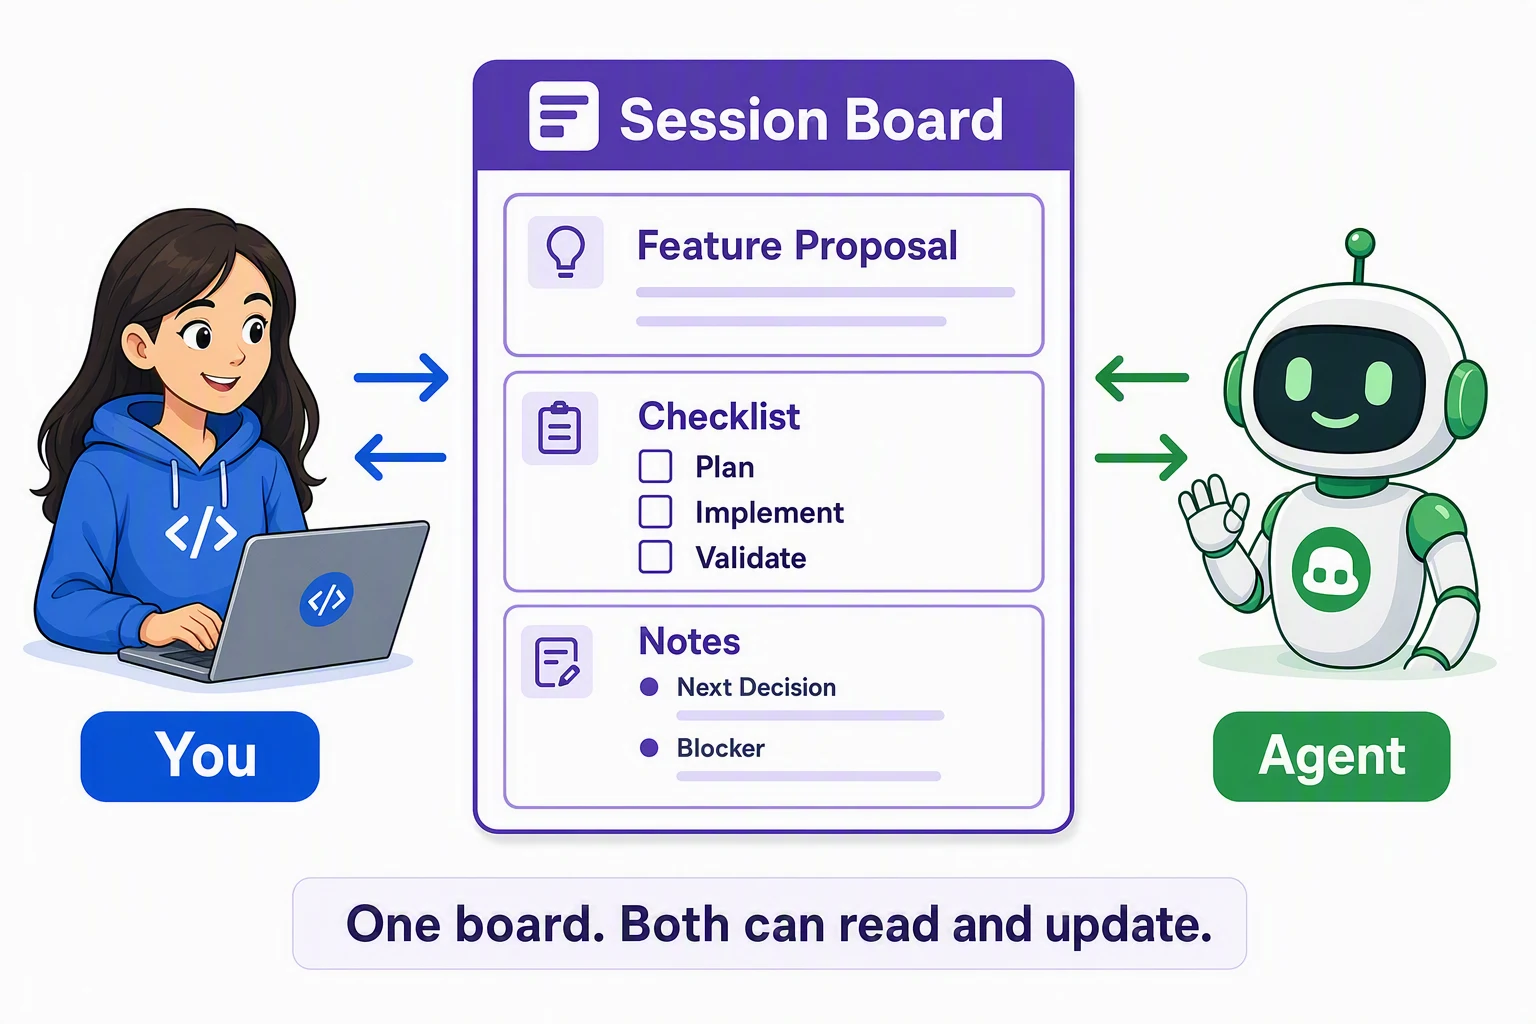
Start with a small canvas that works like a shared checklist. You and the agent can both see and update the same feature proposal, checklist, and notes. This exercise lets you practice those basic interactions before Exercise 3 adds buttons that ask the agent to run development tasks.
-
In the current session, type
/in the prompt box and select/create-canvas, then paste this prompt:Create a simple, user-scoped Session Board canvas. Include: - A Feature proposal text field - A checklist with Plan, Implement, and Validate - A Notes section with Next decision and Blocker fields Let both the user and the agent update the checklist and notes. Keep the layout compact and beginner-readable. Do not edit repository files, run commands, or write to GitHub while creating the canvas. -
When the canvas opens, confirm that it has the proposal, checklist, and notes sections.
-
Enter a short feature proposal.
-
Mark Plan complete and add a next decision.
-
Ask the agent to summarize the current board state. Confirm that its answer matches your updates.
-
Open the Changes tab in the review panel and confirm that it lists no changed files. Creating a user-scoped canvas does not change repository files.
Expected Output: The feature proposal, checklist, and notes remain visible on the board. You and the agent can both read and update them, but the board does not run tests or edit the app.
Exercise 3: Create a Feature Workbench
You will build a reusable canvas that manages the local development inner loop for a new book-app feature. It keeps the feature proposal, plan, implementation, and evidence linked to the same session.
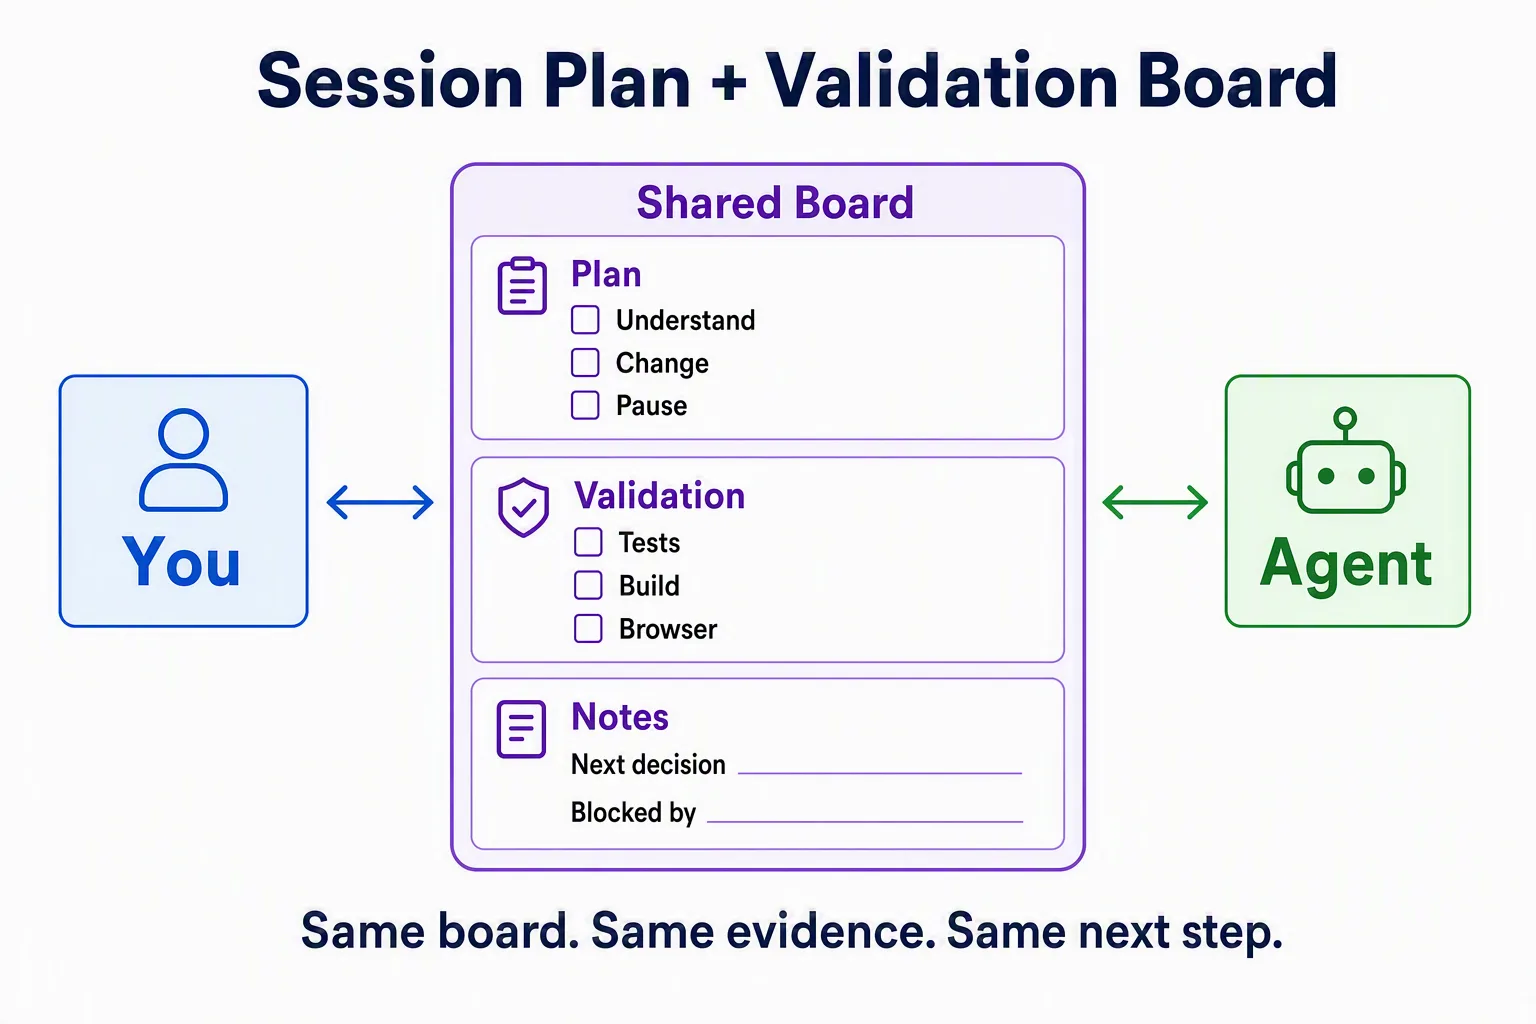
Exercise 2 showed how you and the agent can read and update the same proposal, checklist, and notes. Now you will add canvas buttons that ask the agent to run development tasks and record the results.
-
In the current session, type
/in the prompt box and select/create-canvas, then paste the prompt below. It builds a five-stage workbench with action buttons, a checklist, and an evidence area. You don’t need to read the prompt in full.Create a reusable, user-scoped Feature Workbench canvas for the local dev inner loop in @samples/book-app-web. Simple, compact, beginner-readable. No GitHub writes, no source edits while building it. Every button = agent-callable action (loading/success/error state, saves agent response). No local-only UI. Top: horizontal progress rail = Propose -> Plan -> Baseline -> Implement -> Validate. No Approve stage. Approval happens in the chat's Plan tab. Green = evidence-backed done, neutral = current, red = failed/blocked. Feature proposal: text input + one Generate plan button. Switches session to plan mode, fires prompt without waiting ("Working..." status), agent inspects code + writes plan as usual, presents for approval in Plan tab (never call exit_plan_mode/ask_user elsewhere). Don't render plan text on canvas. Show only a small status pill (Working/Review/Approved/Changes requested) polled from exit_plan_mode events. No edit/approve controls on the canvas itself. Checklist: baseline test, baseline build, implement approved plan, review diff, browser validation (when required), screenshots (when required), final test, final build. Actions in order: Run baseline (test+build, record totals) -> Implement (approved plan only) -> Browser validation (start/reuse dev server, exercise feature, before/after screenshots) -> Run final checks (test+build) -> Refresh evidence. These 4 must never use plan mode/exit_plan_mode/ask_user (unattended), give each a multi-minute timeout not the ~60s default. Evidence: read-only, agent-posted only, no learner notes. Dense one-liners: baseline pass/fail pill, final pass/fail pill + total delta, browser summary + screenshot count, diff summary (files changed), blockers. Truncate long text. Green only if tests pass and final total >= baseline. Before any evidence: "Run a check or capture browser evidence to record it here." Only mark checklist/rail items from recorded evidence, never chat inference. Dense layout, no big empty textareas, no duplicate buttons, user scope.What this prompt is asking for, in plain language
The prompt is written for the app, not for you to memorize. Its key phrases mean the following. For other terms, see Terms used in the exercises.
Phrase in the prompt What it means ”Every button = agent-callable action” Each button asks the agent to do real work (like running tests), not just change something on your screen ”never call exit_plan_mode/ask_user elsewhere” Plan approval should only happen in the session’s Plan tab, not through a canvas popup ”polled from exit_plan_mode events” The canvas checks the plan’s approval status periodically instead of you having to refresh it ”give each a multi-minute timeout” Test, build, and browser actions can take longer than a typical quick response, so don’t let the canvas give up early ”user scope” The canvas is saved to your machine across projects, not committed to this repository 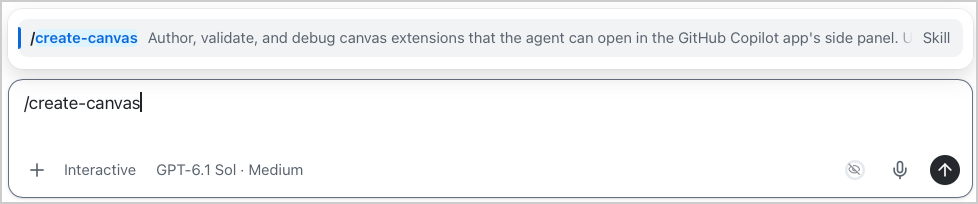
-
The canvas should open in the right side panel once the agent is done building it.
Important: Generated results can differ between runs. Check the expected structure below before you continue. Do not repeatedly regenerate the full canvas.
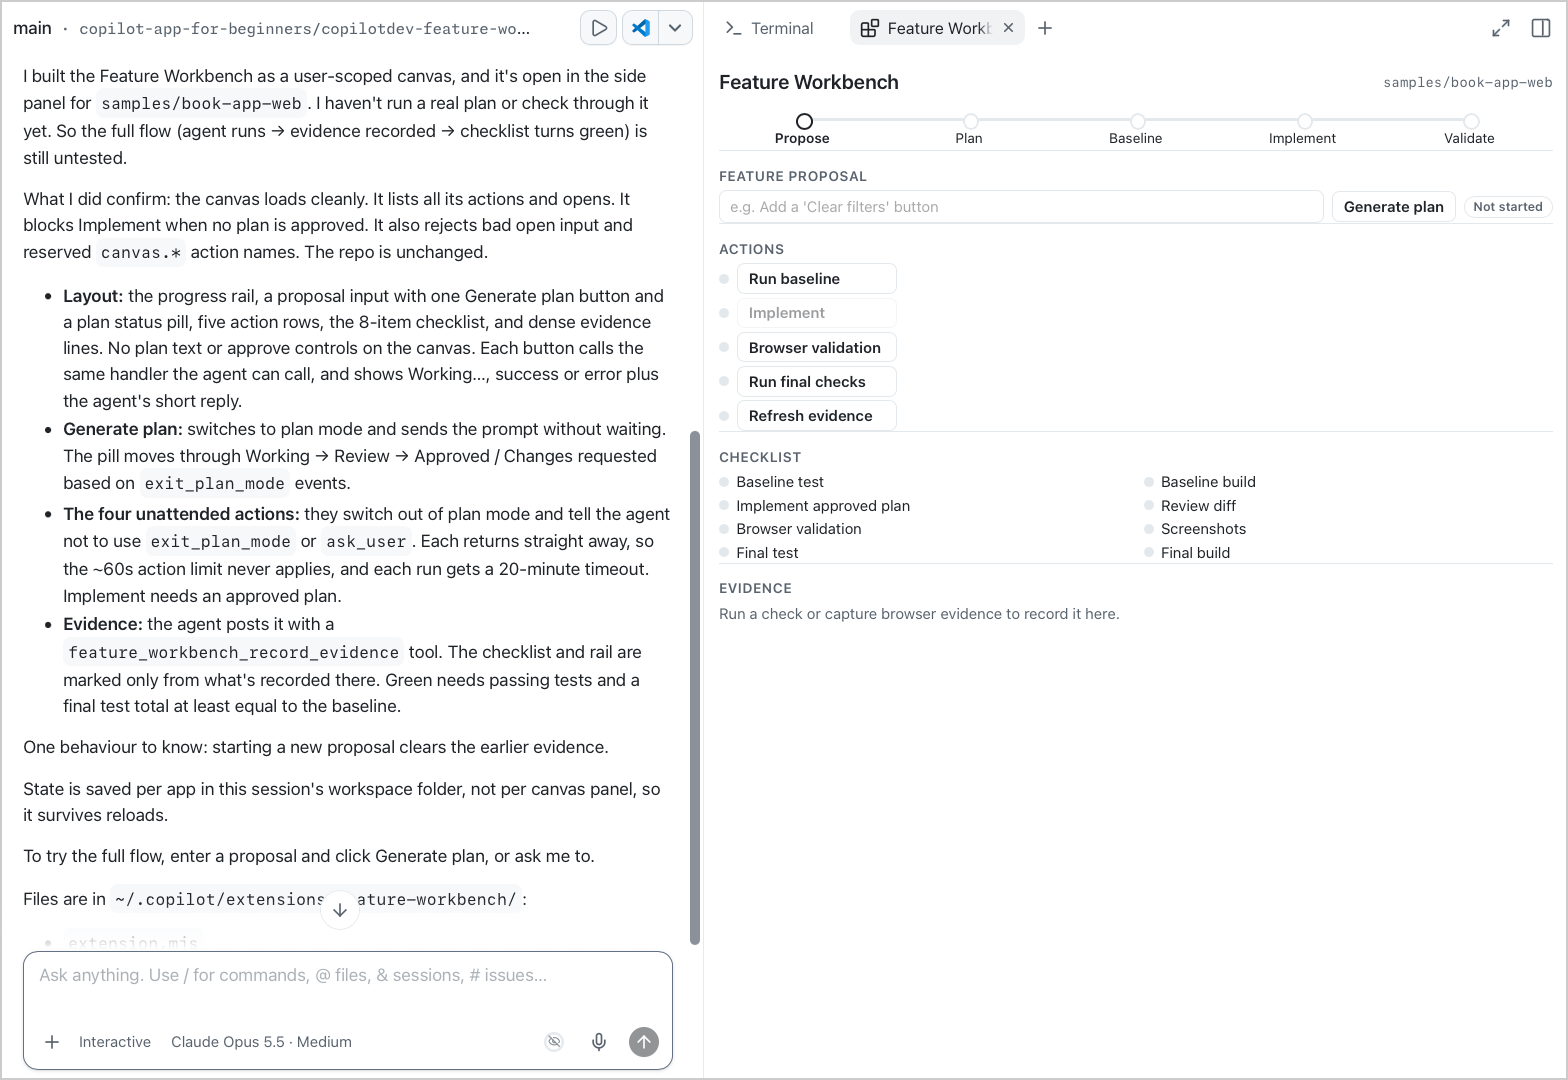
Confirm that the canvas has:
- Five stages: Propose, Plan, Baseline, Implement, and Validate
- One feature proposal field and one Generate plan button
- Eight checklist items
- Actions for baseline, implementation, browser validation, final checks, and evidence refresh
- An empty evidence area before any action runs
If one part is wrong, use the matching repair prompt:
Repair prompts (use the one matching what's wrong)
Keep the current canvas. Add any missing stages, checklist items, or actions from my original request. Do not redesign parts that already work.Keep the current canvas. Update checklist and progress state only from recorded action evidence. Do not infer success from chat text.Keep the current canvas. Give baseline, implementation, browser validation, and final-check actions enough time to complete npm and browser work. Show loading, success, and error states.If the canvas still does not match after two focused repairs, use the Markdown fallback and continue with the validation steps manually.
-
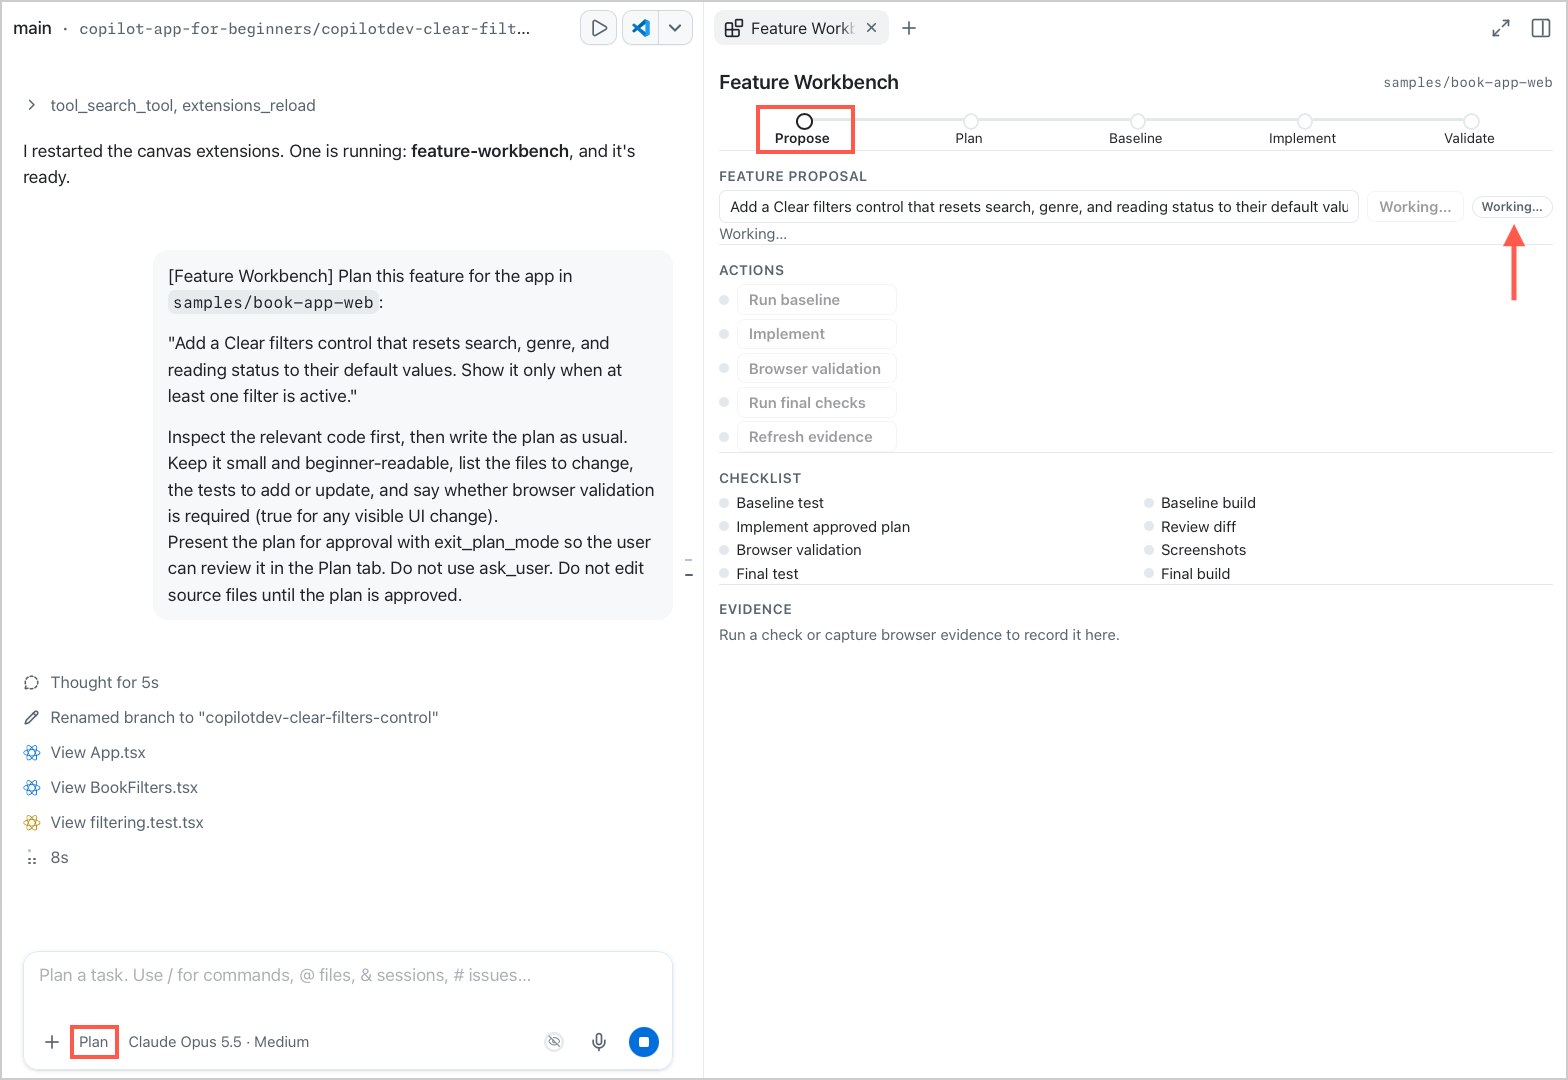
In Feature proposal, paste the following, then select Generate plan:
Add a Clear filters control that resets search, genre, and reading status to their default values. Show it only when at least one filter is active.The session switches to Plan mode and the agent writes an implementation plan. The canvas stays at Propose with the status Working….
-
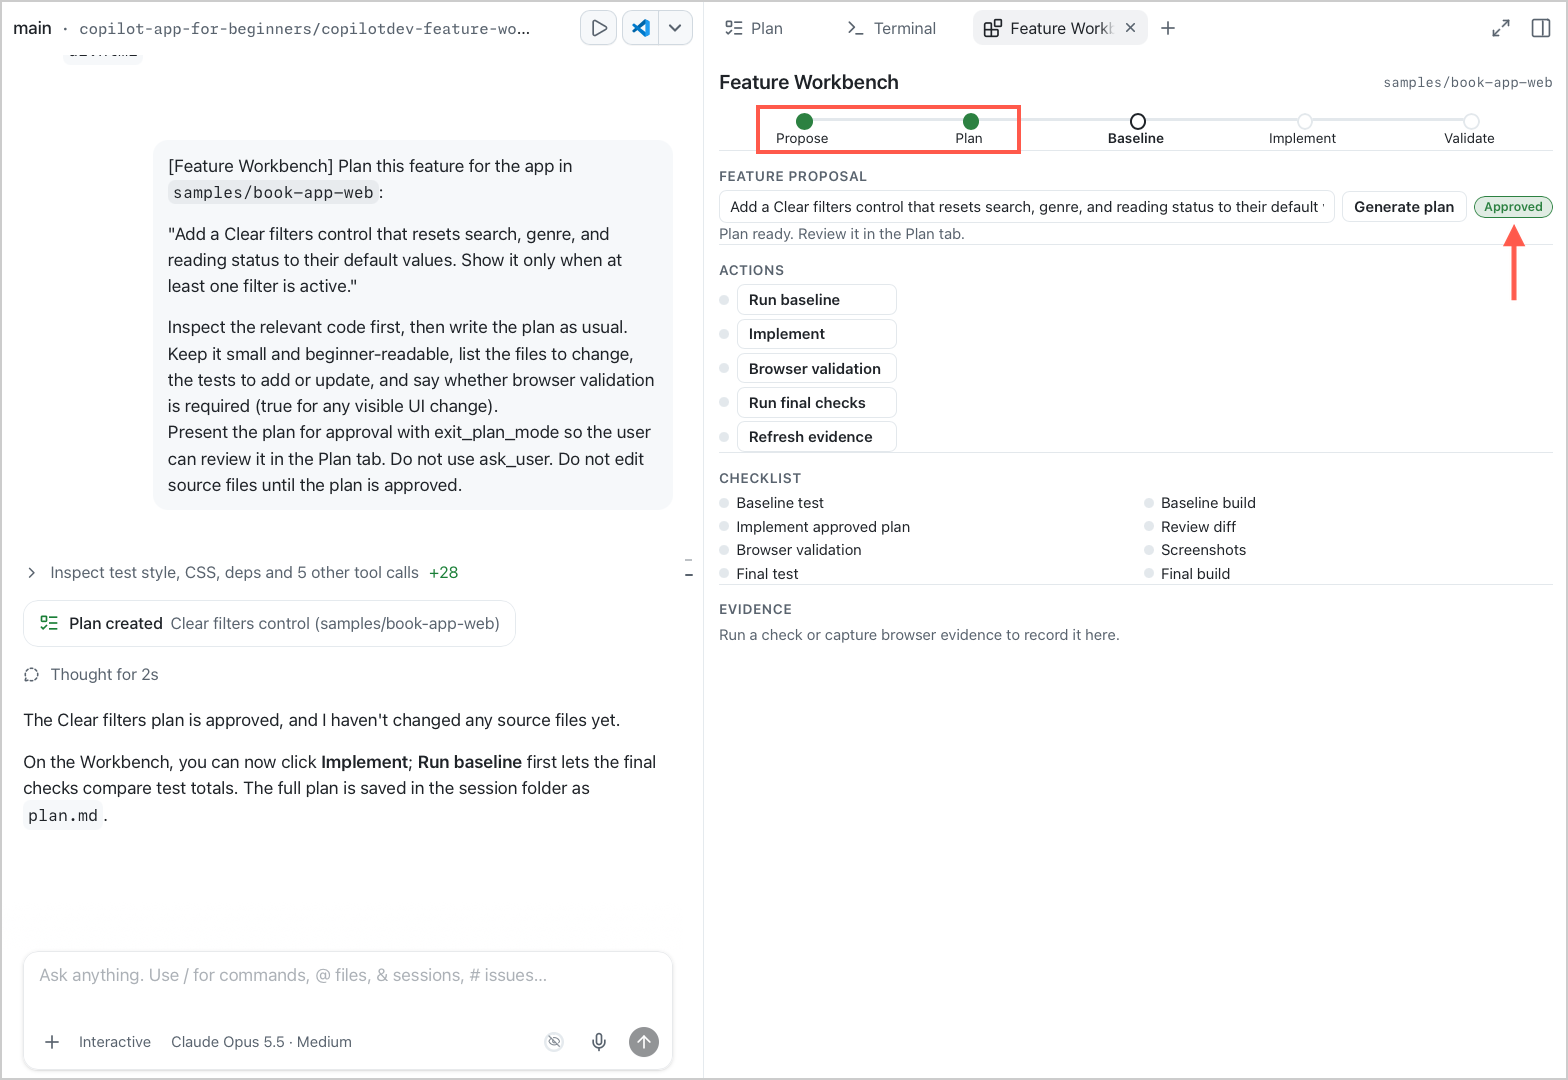
Review the plan in the Plan tab. In the Review plan box at the bottom of the chat, select Exit plan mode and I will prompt myself. Then select the Feature Workbench tab to return to the canvas. The Plan stage should be complete, and the feature status should show Approved.
-
Select Run baseline on the canvas to record the app’s state before any change. In the chat, expand the tool calls for this action (
npm test -- --runandnpm run build). Confirm that the test total and build result on the canvas match their output.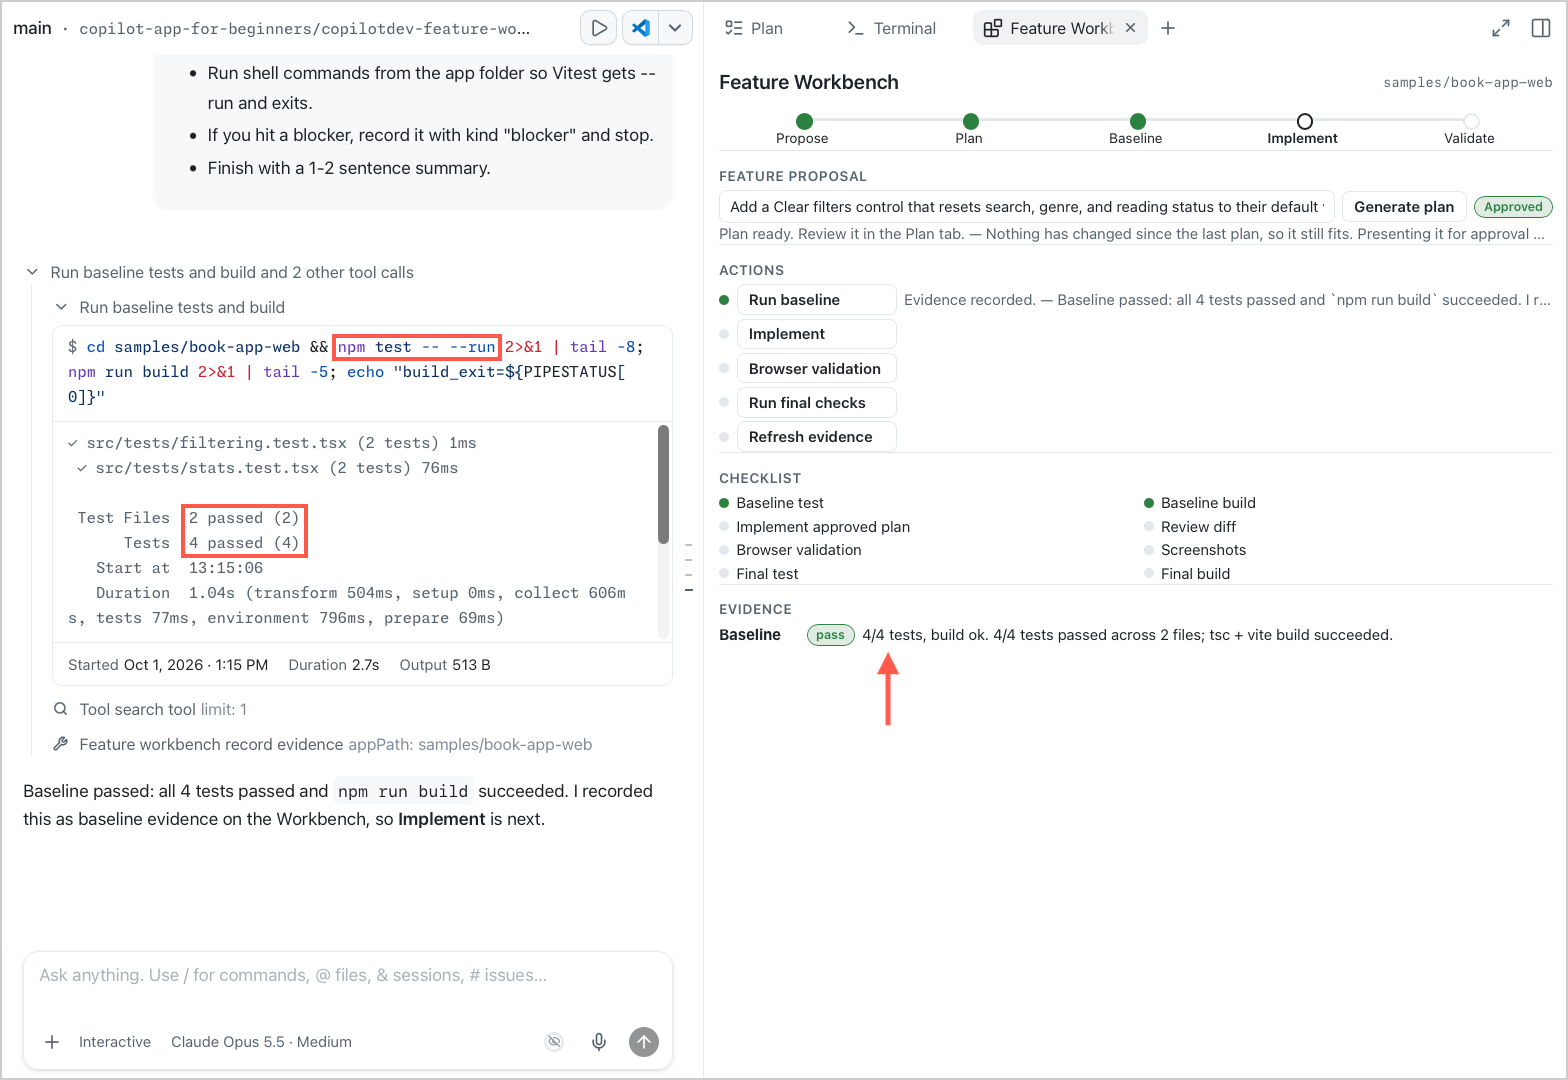
The Baseline stage and its two checklist items should show as complete.
-
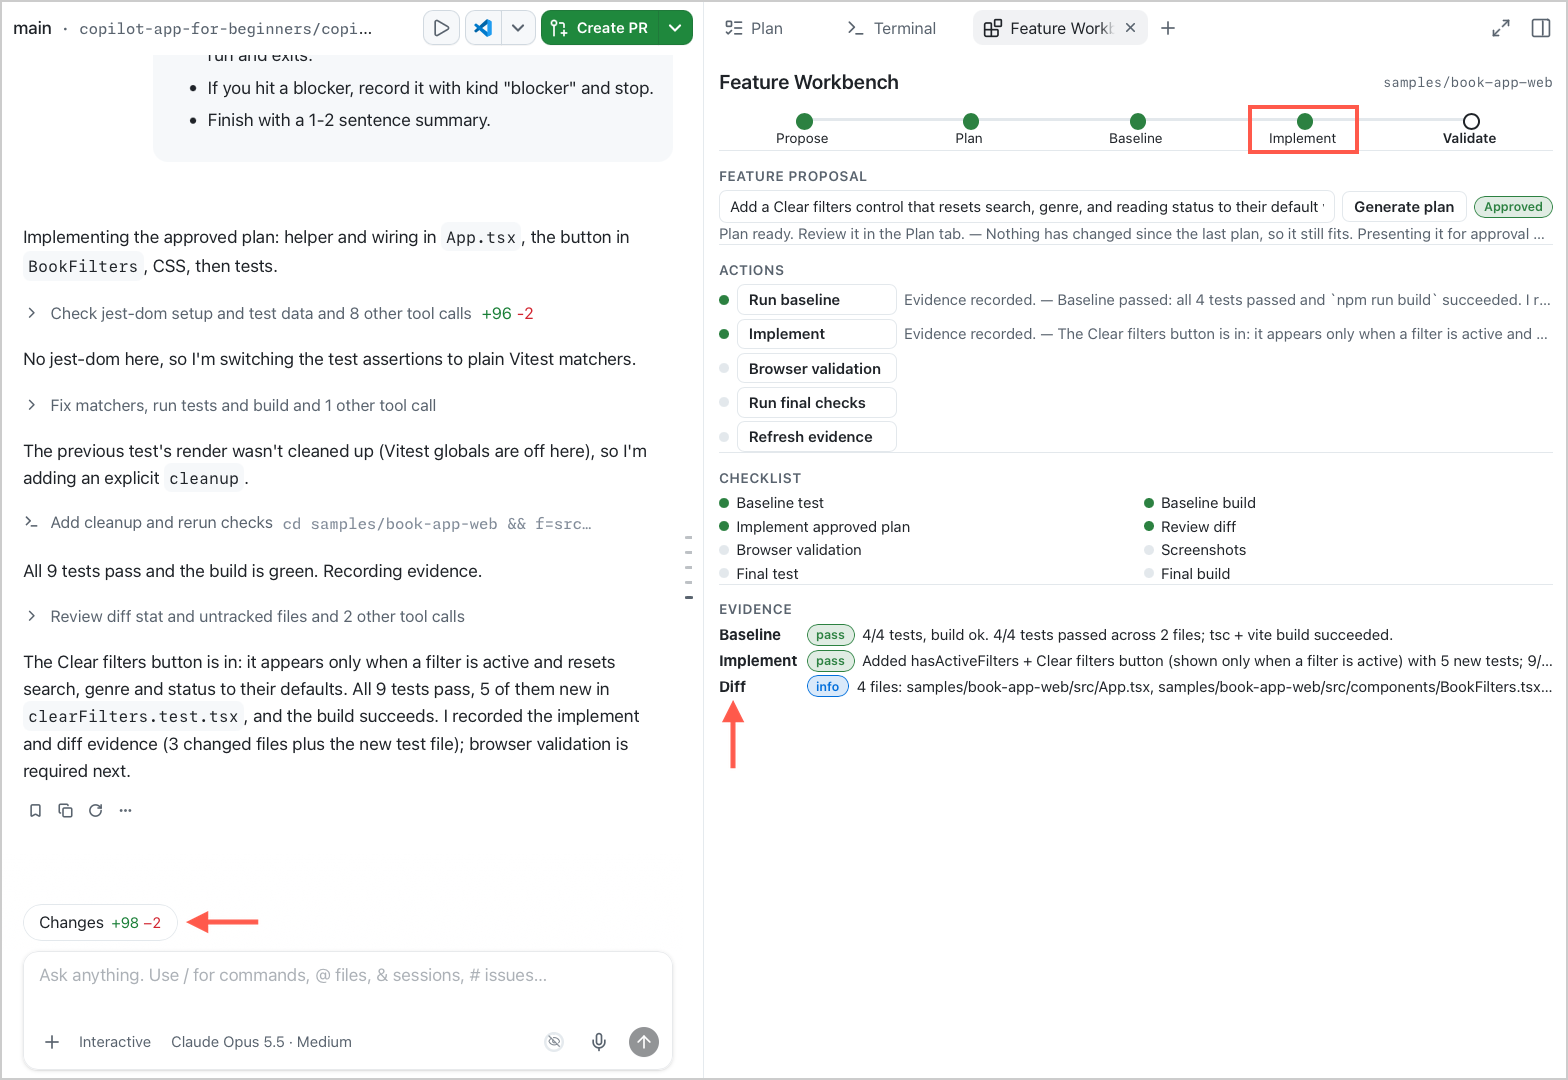
Select Implement to build the feature from the approved plan. When it finishes, the Implement stage is complete and the evidence has a Diff row. Select the Changes pill above the prompt box and confirm that the changes are limited to the approved feature.
-
Select Browser validation to have the agent check the feature in the browser. Then check these states yourself:
State Expected behavior No filters are active Clear filters is not visible A search term is active Clear filters is visible A genre or reading status is active Clear filters is visible You select Clear filters Search, genre, and reading status return to their defaults Filters have been cleared Clear filters is not visible, and the full book list and statistics return 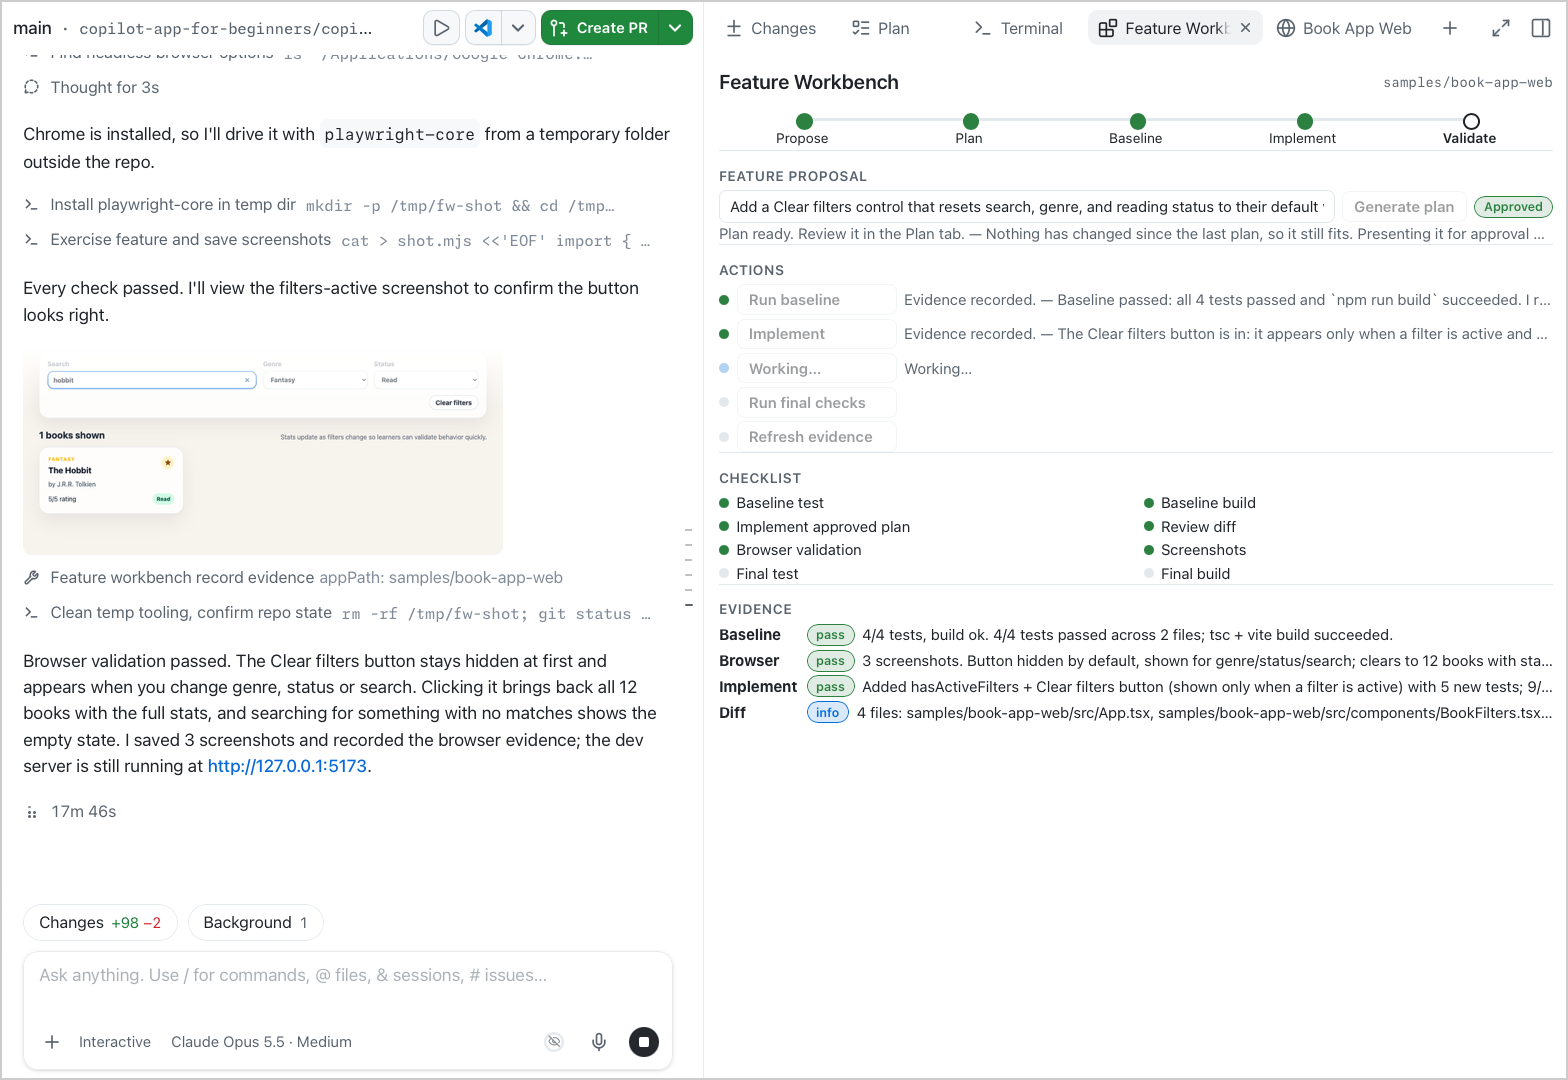
When you finish the checks, select Background above the prompt box and stop the dev server. Until the dev server stops, Browser validation can keep showing Working…, even after Copilot reports the result.
-
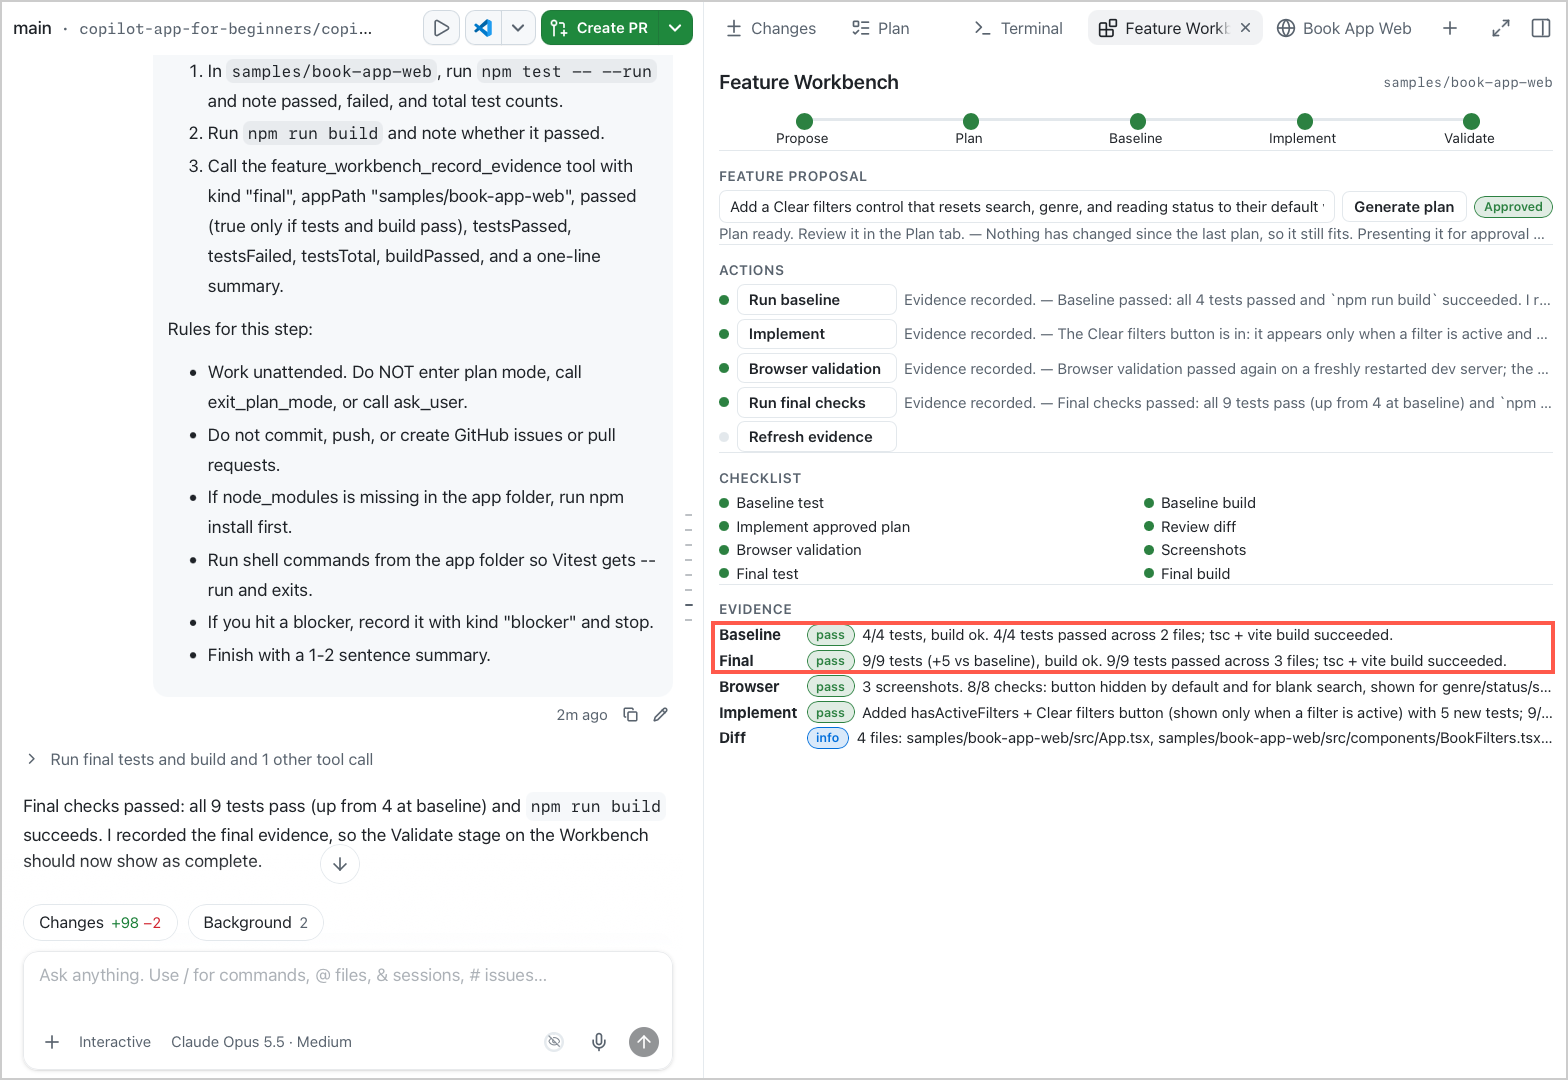
Select Run final checks. Confirm that the tests and build pass, and that the final test total is at least the baseline total. The total can go up if the implementation added tests.
Optional: Markdown fallback if the canvas doesn't work
Markdown Fallback
If /create-canvas is unavailable or the generated canvas still does not work after two focused repairs, keep the same workflow in a Markdown artifact:
Create a Markdown artifact named feature-workbench.md. Do not add it to the repository.

Include the Propose, Plan, Baseline, Implement, and Validate stages; the eight checklist items from my Feature Workbench request; and an Evidence section for baseline checks, changed files, browser validation, final checks, and blockers.

Update an item only after the current session produces matching terminal, diff, or browser evidence.
Open the artifact from the session’s Files tab. Run the baseline, implementation, browser, and final-check steps from the session, then ask the agent to update the artifact with the evidence you verified. The Markdown artifact does not have action buttons, but it keeps the same plan and validation record visible.
Behind the canvas: Where canvas files live
You ran /create-canvas in Exercises 2 and 3. Opening the generated files is optional.
| Location | Scope | Best for |
|---|---|---|
~/.copilot/extensions | User | Personal experiments. Prefer this in the course so nothing is committed |
.github/extensions | Project or team | Shared course and team workflows |
A canvas includes an entry file such as extension.mjs. It can also include other modules, an HTML view, a package.json file for metadata and dependencies, and files that store its state.
Pause before accepting extra generated code. Inspect capability names, stored state, UI controls, and whether any private data is included.
If a canvas fails to open after edits, check extension dependencies, reload requirements, syntax errors, and whether the app is reading the user-scoped or project-scoped folder.
Troubleshooting
If something does not work as expected, check the problems below. The Troubleshooting Reference lists problems and fixes for all chapters.
Canvas problems
No canvas opens
Confirm that you typed /create-canvas. Submit the prompt Restart canvas extensions once. If the command or the panel is still missing, use the Markdown fallback.
The community canvas is not listed
Look for Repository Issues Kanban. accessibility-kanban is the package name, not the name that the app shows.
The generated layout is incomplete
Compare the canvas with the expected structure in the exercise. Then use the one repair prompt that matches the missing part.
The plan status stays at Working
Answer the Review plan box at the bottom of the chat. Then select Refresh evidence on the canvas.
The Terminal or Browser tab is missing
If the review panel is hidden, select View > Toggle Review Panel. In the review panel, select +, then Terminal or Browser. If the tab is still missing, update the app to the latest version.
The board does not match the evidence
Compare the board with the terminal and browser output from this session’s worktree, not with an example image or another session. Confirm that commands ran in samples/book-app-web. Uncheck any item that has no output to support it, then run the check again.
Sensitive data appears in a custom canvas
Remove the data and replace it with safe sample data. If you took screenshots of the canvas, take them again.
Key Takeaways
- A canvas gives the session a visible, shared board in the side panel.
- Create that board with
/create-canvasand a short description. - Community canvases from Awesome GitHub Copilot let you install and try the interaction model before building your own.
- Evidence on the board should come from actual terminal or browser output, not from chat inference.
Assignment

Core Assignment
Extend the Feature Workbench with an Assess stage after Propose. The stage must compare a feature proposal with the app’s current behavior before planning starts.
Pick one small, beginner-safe improvement in samples/book-app-web that you have not already shipped in an earlier chapter.
-
Add an Assess stage after Propose to evaluate the feature proposal against the app’s current behavior. Type
/, select/create-canvas, and submit a focused change request, like the repair prompts in Exercise 3. For example:Keep the current Feature Workbench canvas. Add an Assess stage between Propose and Plan. Assess asks the agent to compare the feature proposal with the app's current behavior and records the result as evidence. Do not redesign parts that already work. -
Run the workbench through assess, plan, baseline, implement, and validate.
-
Confirm that each completed stage has evidence from the current session.
Core Success Criteria: The canvas shows evidence-backed progress from assessment through local validation, and you can identify the next decision without rereading the whole chat.
Optional GitHub Workflow Challenge
Complete this challenge only if you have permission to create issues and pull requests in the training repository. Review the issue and pull-request workflow from Chapter 03 before you start.
- Add actions that create an issue for the assessed feature.
- Create a pull request that links to the issue.
- If Copilot code review is available to you, request a Copilot review.
- Keep the issue, pull-request link, and review status visible as evidence on the canvas.
Challenge Success Criteria: The canvas shows an open pull request linked to the issue. If you requested a Copilot review, the canvas also shows its status. Do not merge the pull request as part of this assignment.
What’s Next
In Chapter 07, you’ll turn repeatable prompts into automations. You’ll create a manual pull request readiness report and then schedule it. The chapter ends with an optional section on event triggers and cloud automations. You don’t need to merge this chapter’s feature or keep its canvas open to continue.
← Back to Chapter 05 | Continue to Chapter 07 →